Monthly Archives: November 2012

A Step Up

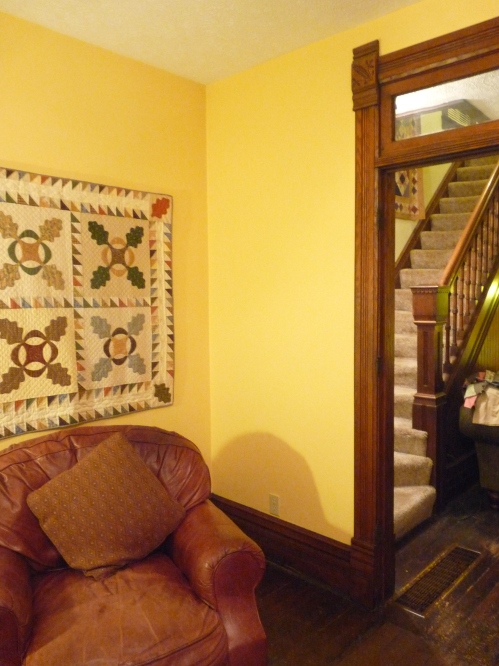
For about 13 years, as long as we have lived in this house, we have been piling our afghans on the speaker behind the TV cabinet door. Sometimes they’re in a neat pile, more likely though the pile ends up falling over the side and spilling onto the floor a bit. We use the blankets regularly so putting them out of reach in a closet, or even in some sort of storage container out of the way wasn’t really going to work for our situation.

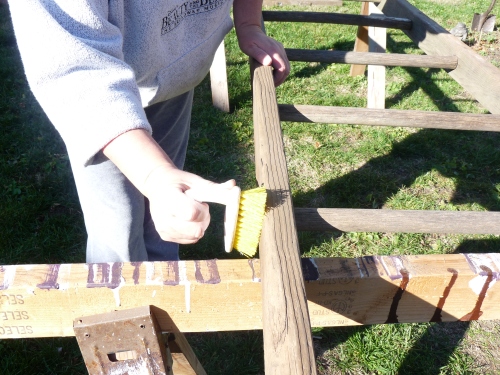
Enter Pinterest! My mom was recently searching around and found the inspiration, or pinspiration, for this project: a whitewashed ladder that leans against the wall. As an added bonus we had all of the supplies that we needed for this project, so it was FREE! We needed a wooden ladder, white paint, paint brush and rags. There were three ladders to choose from in our collection. (Eliina’s note – I wish I had the storage space to be a pack rat, I mean collector, like you). Mom selected the one she wanted to use and set it up on a couple of saw horses to get it off the ground. She used a scrub brush to clean off the dirt that had accumulated on the ladder while it was out the in yard.

Meanwhile I researched how to make whitewash.  There were quite a few different recipes out there on the web but we went with the simplest:  a ratio of 2 parts paint, 1 part water.   We used part of a milk jug as a vessel to mix the paint and water. I rinsed out an aluminum vegetable can and used that to measure the water and the paint.  A half a can of water and one can of paint was more than enough for this project.

Before we started painting there was a small repair to do on the bottom rung of the ladder.  One side of the rung  was a bit loose after being outside in the elements. It was a really quick fix.  After putting in a new screw it was sturdy enough to do the job.

Now for the real work. The process we used can be done by one person, but my mom and I tagged teamed it. She worked down one section at a time, painting in long sections and I followed behind with a rag to wipe off some of the paint to give the ladder the whitewashed look we were going for. There isn’t a hard and fast rule to how long to let the paint set.  I found that after a few minutes it had soaked in a bit and I could go along and not wipe too much off. The other factor to keep in mind when doing any whitewashing is how aggressively you wipe off the paint. Lighter pressure will leave more paint on the wood and heavier pressure will remove more. We simply moved in sections, going back if too much paint was rubbed off or if there wasn’t enough coverage to begin with.

We decided that one coat was perfect. It left enough of the wood grain showing through but it still looked intentionally whitewashed, and not just worn.

We left the ladder out in the yard to dry for the afternoon and overnight, after checking the weather forecast for rain!

We had recently rearranged the living room furniture for fun, and there was a spot in the corner of the room that was screaming for a little something with texture and height.

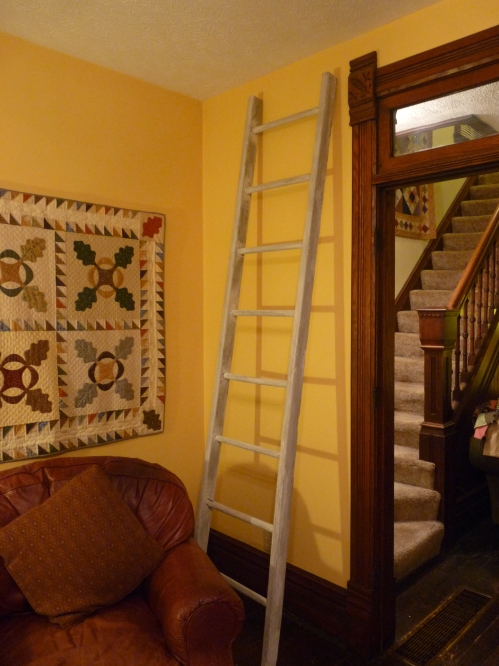
After putting the ladder in its location mom took the six blankets we had previously stacked on the speaker (yes we like options when it comes to warmth) and placed one on each rung of the ladder. Doesn’t it look great there in the corner, and doesn’t the speaker look better without a pile of afghans on it!

-Emily

Smitten Kitchen visits Chicago

On one of the great things about living in a city like Chicago is that no matter what you’re into, there is usually something going on that will interest you.  I’m a big blog reader, and incidentally several of my favorite bloggers have been on tour promoting their books recently.  Emily and I went to the Young House Love book signing the other week, and this past weekend I attended the book signing for the Smitten Kitchen Cookbook.

I have been a fan of Deb Perelman’s blog since 2008, and have tried dozens of her recipes over the years.  The Chicago book signing was held at one of my favorite independent bookstores, the Book Cellar in Lincoln Square. (There is a bar in the store, what’s not to love?) I anticipated that an author of her popularity would draw a big crowd, so I arrived an hour before the event start time.  The Book Cellar is a small space, and a winding line outdoors would block the entrances to other nearby businesses.  They had an interesting strategy for dealing with the crowd that was gathering to have their cookbook signed – they assigned attendees a group, much like boarding groups on an airplane.  Each group had eight people, and since I was in group K, there were at least eighty people ahead of me.

My friend Lindsay lives in Lincoln Square, and came by to hang out with me.  Lincoln Square is an old German neighborhood in Chicago, and while the neighborhood has changed over the years, some classic German bars and restaurants remain.  We found a pair of seats at the bar at Hüettenbar and settled in for a few beers.

After leaving the bar we killed time in a kitchen shop before heading back to the store to find out if my group had been called.  I spotted the author’s husband and adorable toddler son leaving the store as I was walking in to meet her.  She was sweet and gracious in person, and as you can see posed for a photo with me.

I leafed through the book in bed later that night, and have tabbed two recipes to make for Thanksgiving dinner this week, and many more to make later.  I highly recommend her blog, and the book looks like it will be a great resource too.

-Eliina

Monogram chevron pillow

I’ve been pinning cute monogram pillows on Pinterest for months, and my pillow predicament inspired me to actually make one.

I loved the yellow and cream chevron material I used to recover my bar stools, and since I had some left over I thought it would look great covering a pillow on my couch.  Several of the DIY pillow projects I’d seen online used felt for the monogram, so I picked up a coordinating piece of felt.

Then, I invited Emily to town under the pretenses of a Young House Love book signing, and asked her to pack her sewing machine.  I do not know how to use a sewing machine, let alone own one. Fortunately my crafty family is usually willing to help me out.

Emily measured the size of the square pillow we were using as a base, and leaving an extra quarter edge around the edge for seams, cut out the front of the pillow.

Since this pillow would have an obvious front side with the monogram we decided to make the back a pocket.  It would be a little easier than sewing in a zipper, but would still be removable.  With my sixteen month old daughter around, spills are inevitable, and I prefer decor I can launder.  We wanted the pocket to be at least six inches deep, so Em took the measurement for the front of the pillow, divided it in two, and then added six inches.  She then hemmed the outer  edge of the pocket pieces.

Meanwhile I found a font I liked, and printed out a large letter P.  I then traced the letter onto my piece felt, and cut it out.  Emily pointed out that if I traced it backward, the ink from the pen would be on the back, and I wouldn’t have to worry about cutting off every pen stroke.  She’s a smart one, my sister.  Also, she didn’t gripe about the vastly unequal division of labor.

Em centered the letter in the middle of the front panel, and sewed into place.

After that she pinned the three panels together, wrong side out, and sewed them together.  I may have fetched a Diet Coke.  The pillow fit inside perfectly.

The finish product looks great on my couch, especially next to the crocheted pillow cover Emily made for me.

Thanks, Em!

-Eliina

Crocheted Cover

I have been crocheting for about 12 years now and I feel I am fairly competent with my hooks. I can read patterns, make up my own patterns and usually figure out what stitches were used on a completed project that I am shown. When Eliina brought up the idea of making a pillow cover for her couch I figured it would be something I could handle. I needed some inspiration. I didn’t want to make something that was more my style that might not really jive with what she had in mind. She linked me to a few suggestions and I started looking for possible stitches to use.

A great source that I use for crocheting information is Stitch ‘n Bitch: The Happy Hooker. I have had this for a few years and it has greatly increased my repertoire of stitches. I would recommend this book to anyone wanting to learn how to crochet and to those that already know how – it is a real wealth of information. But once I decided on the look I was going for I took to the internet to see what was out there. I found that to best achieve the look I was going for I would use alternating single and triple crochets.

I thought a neutral cream for the yarn so other pillows could be switched out during the year but this pillow could stay for some added texture. Eliina provided the pillow form, found for $5 on clearance!

I wasn’t sure exactly how many stitches I would need for this because I would be making up my own pattern as I went along. To keep with the chunky textured look from my example I decided to use a little larger hook, a J hook, this would not only make the bumps larger but it would also help the project work up a little quicker…BONUS!

I started off with chaining a length and laying it across the pillow to see if it was about wide enough. Then I started on the pattern, one row of alternating triple crochets and single crochets and then a row of all single crochets. That was it, the whole pattern consists of two alternating rows.

As I worked and thought I was close to the end I again layed the work across the pillow to see if I needed to continue. Based on the sample ideas I had I knew I was going to do a make a pocket cover so instead of making a front and a back I made one piece that would be sewn together. After achieving the length I needed I marked my stitches so I knew where the pillow would fold over the top and then continued on. Each flap needed to be over half of the length of the pillow to allow for overlap once the pocket was made and the buttons sew. Once I had the length I wanted for the top I detached my yarn and reattached on the bottom of the back and worked my way back up.

One possible hiccup in the project was making button holes. This was the first project I have done that needed them and I was a little unsure of the process. My handy Stitch ‘n Bitch book had a great tutorial on how to recreate horizontal button holes, which are easier, and after deciding where they should go I had the button holes made. Lining up the buttons on the bottom half was pretty simple as well and crochet can be quite forgiving so I knew if they were off by a smidge things would still work out fine!

Now I had the rectangle made and ready so I folded up the bottom half and used a slip stitch to connect the front and the back. After it was all stitched together I stuffed the pillow form into the cover. I will admit I was relieved to find that it fit nice and snug. Not using a pattern had me a bit worried I would end up with a cover that was either way to big or had to be stretched too much to fit. The final step was to stitch a single crochet all around the outside of the pillow just to finish everything off.

Pillow cover complete! I am really happy with how it turned out. Now maybe I should actually write up the pattern for future use!

-Emily

Addendum from Eliina: The pillow looks great on my couch, and is helping me solve my pillow predicament.

Bringing the Love to the Young House Love Book Tour!

Eliina: It’s no secret that we at 3E Design LOVE Young House Love.  The way Sherry and John Petersik have transformed their houses in ways big and small is totally inspiring.  I love their clear instructions and conversational writing style.

Emily: My first experience with Young House Love was after Eliina showed me their weekly pictures of Clara when she was pregnant.  I thought it was fun idea that was for tracking a baby’s growth, from there I got hooked on the regular around the house projects and I became an official fan. I have passed on their website to tons of people whether they want it or not!  Reading their posts is my “treat” at work every day.  If there are tasks that I am not in the mood for I make myself get those things done before I take a peek at their morning post.  I love that they are wordy because it helps to really understand the process.  They really make you feel like you could complete any and all of the same projects.

Eliina:  They recently published a book, and planned a tour with stops all over the country.  Lucky for me, they planned a stop in my home city.  I thought it would be fun to go, and what would be better  than going with my sister and fellow fan, Emily?

Emily: When Chicago was announced as a city on the tour I knew I wanted to make a weekend trip to do the book signing and visit my favorite Chicago sister.  John and Sherry make you feel like you are one of maybe a dozen people reading their blog, though really they have millions of hits every month!  I wanted to be a part of the fun!

Eliina: The Chicago event was held at West Elm in Lincoln Park, about a twenty minute drive from my place in Chicago’s Logan Square neighborhood.

Emily: I took off from work early on Friday and made my way to Chicago.  Smooth sailing was the name of the driving game, by some miracle the only slowdown was during the last 6 miles of highway in Chicago, and even then things moved along.  I took that as an omen for a great weekend!  I was super excited not only for the book signing but also to see my niece Alice.  She was excited to have someone to show off for, and I enjoyed every minute of my time with her.  She can even say my name!  If I wasn’t convinced of her cuteness before I am fully convinced now!

Eliina: The event started at 1pm, and when we got in line around 11:30 there were probably 200 people in line ahead of us.  Em bought a copy of the book and we settled in to wait.

Emily: Holy Thunderstorm Batman!  That’s right, with a storm like we had waiting in line it deserves the reference.  Pouring rain, (thankfully we were on the inside edge of a covered walkway outside the store), BIG booms of thunder and even bolts of lightning, all endured to get my beloved book signed by John and Sherry.

Eliina:  The West Elm folks had promised cookies and cocoa, and they delivered.  Staff members brought out house and heart shaped cookies, followed by mugs of hot cocoa.

Emily: Ok, so maybe I was getting a little loopy by the time the cookies came around, but I do love a sugar cookie and so my reaction was warranted.  One of our line mates, a lovely visitor from Estonia, had the cutest reaction to the cookies being brought outside for us.  She said “This is why America is awesome”, indeed, if you have to wait in line, cookies and cocoa make it all better.  Go USA!!

Eliina: We were super excited to finally make it into the store.

Emily: As a little teaser once we were inside the store they had a couple of projects set up for us to look take a gander at.  I thought the etched glass votives were a cute idea, and they even referenced where you could find the idea in their book.  And how could we pass up the chance to pose with a huge poster version of their book cover.  Crazy!

Eliina: After seeing hundreds of photos of these people on their blog, it was strange to see them in real life.  They were friendly and gracious during the brief time we spoke with them.

Emily: Even though we only had a few moments actually at their table to get the book signed and get a picture or two snapped they were so warm and still energetic.  There must have been over 200 people ahead of use and more than that after us so they were in a for a long afternoon of signing and smiling!  I am so happy that we took the time to go to the signing.  We had a good time chatting in line, flipping through the book a bit and enjoying our cookies and cocoa.  I would go again in a heartbeat, especially if it means getting to see my sweet niece Alice as a part of the deal.


Pillow Predicament

It took my now husband and I several weeks of looking for find a sectional that would fit into our typical long, narrow, Chicago condo.  We finally found the perfect sofa at Roy’s in Lincoln Park, an independent furniture store that had a large selection of furniture that wasn’t made for suburban McMansion living rooms.  (If you’re interested in checking them out, although Roy’s burned down this past May, they have a temporary showroom in Pilsen).  We brought our brown leather sectional home and over the past three years logged many hours of naps, movie marathons, and football games, not to mention all my nursing sessions with our daughter.

What I’ve never done is properly outfitted it with throw pillows.  I first had a little pair of blue pillows that coordinated with our old rug.  Those were replaced with a yellow and grey floral pair that work well with the yellow wall at the front of the room. Still, two little pillows floating on a decent sized sectional wasn’t doing it for me.  I’ve issued a challenge to myself to up our sofa’s comfort and style factors by adding some more pillows to the mix.  To make things more interesting, I’ve also decided that they needed to be handmade.

Here’s a photo of where we’re starting.

Let’s see where this challenge takes us!

-Eliina

It’s Turkey Time!

In honor of the main protein served this month I thought of a quick and easy craft project. This fingerprint turkey idea was really simple and could be done with kids of any age. As with my thankful wheel project these were completed by the cousins, ages 5, 8 and 11.  They all had fun and all completed these without any assistance.

The supplies were again things I just had around: card stock, stamp pads and a few markers. The only thing we needed was our finger prints.


Using the brown stamp pad we used our thumbs for the body of the turkey and our index fingers for the head. After that we used a variety of colors to make the feathers. I decided that we didn’t have to use all realistic colors for this project.  After all,  it was just for fun.


To help keep things neat I asked that the girls use one color for each row of feathers, but other than that they were off to the races. Valerie worked very quickly and requested permission to make a second turkey, Stephanie finished next and wanted make another on a separate piece of paper, and Lexa was the last to finish.  She worked very carefully, and wanted very boldly colored feathers.

The final step was to use a few markers to add the legs, beak, “gobbler”, as I like to call it, and an eye. Theses were the “required” elements on the turkey, just to help the final project look turkey-esque. They decided to give a few more embellishments for fun.  Might as well keep it fun, after all, what is life without a little whimsy?

-Emily

Editors note from sister Eliina – Like poulty and whimsy?  Then you must love this classic post by the Bloggess.

Being Thankful

I’ve always loved holiday crafts.  I think it’s the teacher in me.  What is a holiday at school without a craft to go along with it, right? Well, now that I am not teaching, I have to get out that need for craft somehow and this holiday idea was graciously completed by my three young cousins. Whenever I babysit these cousins I like to have a project or game up my sleeve to keep things fun and they are always up for whatever I have planned. This past Friday night I had my crafty hat on for my time with the ladies.

For the first project, we created framed paper wheels kind of reminiscent of pies that spin to reveal what the girls are thankful for.  This idea was pretty easy to execute.  I had to help my kindergarten aged cousin with some of the cutting but other than that she was able to complete it by herself.

The supplies were all things I had on hand from previous projects: patterned scrapbook paper,card stock in several colors and small brads (paper craft fasteners).  I also brought along a set of alphabet stamps and stamp pads in a variety of colors.

The project requires paper circles of two different sizes, and I used a bowl and a salad plate at home to make a template for the girls to use.  The girls quickly got to work with their tracing.  They needed to cut out two small circles from solid card stock in contrasting colors. We cut a pie shaped wedge from the small circle that would eventually be on top.  Then they used the larger circle template to cut a circular hole in the patterned paper they chose as the frame for the project.

After all of the pieces were cut out it was time to stamp. I let the girls pick out a stamp color that coordinated with their paper color. Lexa decided to alternate upper and lower case letters, Valerie chose to use two different colors and then Stephanie went with all capital letters and one color, like the sample I had made for them.

The trickiest part of this project is finding the center point of each piece so they would line up once assembled. I did this by gently creasing one of the smaller circles in half and then in half again to create a center point. After finding the center point on one piece I lined up the rest of the circles and punched a hole through each piece.

Now for the final assembly!  Take a full sheet of patterned paper and secure it to a sheet of plain card stock of the same size using double sided tape.  Use a pattern that coordinates with the paper chosen for the frame.  Next, secure the outer frame on top of the full sheet of patterned paper using more double sided tape.  Then center the two contrasting small circles in the center of the frame space, and attach the circles to the larger sheet of paper using a brad.  Flatten the brad to secure the circles.

Once the assembly was done the girls took some time to write on the bottom circle what they were thankful for.  When the top circle is rotated, the things they are thankful for are revealed one by one.  Valerie, who is in Kindergarten and attends Catholic school, chose to be thankful for all of the Fruits of the Spirit and her family. Lexa and Stephanie chose a variety of things to be thankful for. Though they all had the same templates to work with the final products were unique to each of them.

Stay tuned for the other Thanksgiving project idea!

Halloween Mobile

Shame on me for posting this way late, but my main audience (Emily) doesn’t mind.  I posted about my leaf mobile a few weeks ago.  Using the same base, I changed things up for Halloween.  Using some paper foil spiders and a skeleton garland from a dollar store, I made a spooky mobile to hang over our Halloween centerpiece.

I cut the garland apart, leaving each skeleton hanging from a length of twine.  I punched holes in the spiders with a needle and strung most of them in groups of two or three.

It was a fun and easy way to decorate for the holiday.

-Eliina