One of the E’s

Quite a few years ago my mom bought me a large letter E with a hook on the end. I don’t know where she got it or for what occasion I was given this E but I have held on to it, never having a place to hang it but knowing that it would be useful one day. Now that I’m living in my condo I need ready access to my dog Nelly’s leash.  Enter the E. My plan was to change the color and then hang this on the wall behind the front door for hanging Nelly’s leash and my keys so both will be easily accessible when she needs to go for a walk. It was a cream color and the paint was purposely aged, not exactly the look I was going for in the condo but nothing that some paint couldn’t improve.

E 003-001

E 001-001

To smooth the surface I used some high grit sandpaper on the paint. I was able to smooth out some of the chips and get rid of some of the excess paint. I took a damp paper towel and wiped off the paint dust so the letter was ready for a new color.

E 005

After allowing the letter to dry, I brought out my new paint, pool blue. Using a 1” sponge brush I painted on a smooth thin first layer of paint.

E 010-001

I allowed that to dry for about 20 minutes and then applied a second coat, making sure to paint in nice smooth strokes so I would have a nice finished product.

The final step was be installation on the wall. Two quick screws and it was ready for her leash and my keys! One project done…too many to go!

photo (1)-001

-Emily

Going grey – in a good way

Before I moved in any furniture I knew I wanted to paint the living room a new color. When I bought my condo I painted the whole place from top to bottom including ceilings. The previous owner had been a smoker and to get rid of that smell I painted and replaced all of the carpet. Thankfully over the last five years my tenants respected my no smoking rule and things were still pretty fresh.

Condo Before 2013 014

Even though things were still in great shape I didn’t want to keep the tan walls that I had chosen, but I wanted to keep things neutral. What color would I chose? Well the ever popular neutral of choice for many lately…GREY! I bought a gallon and recruited my dad and we got to work.

photo-001

With dad cutting in and me rolling we got quite a bit done in the first afternoon. I was a little nervous it was looking bluer than I wanted, but I know that paint looks different once it is dried so we kept working.

photo(1)-001

Well after painting for about four hours we called it a night and went home. I went back the next morning to check on things because the furnace had not been working very well. As soon as I walked in I knew that things were not looking good. Due to the lack of good heat in the condo the paint did not dry evenly and it was definitely looking like two different colors on the wall! I knew before that I would need to do some touch ups, but the way things were looking I was sure that I would have to put on a complete second coat on the entire room. I was not happy, but I couldn’t leave it how it was, so I added painting back onto my to-do list.

I went and bought a second gallon of paint, inadvertently buying a higher quality paint but in the same color. By this time we had the furnace up and running properly. I started using the new paint while dad continued with the remains of the first gallon. After the second coat things were looking good.

photo(2)-001

Now that the living room painting was done I continued up the stairs and into the hallway upstairs. The staircase is open, so I wanted to use the same color in the living room and in the stairway.

I ordered a new couch, and it was delivered recently. I’m really happy with everything looks. The second coat of grey paint brought down the blue tone I was originally worried about. I’m excited to get some thing on the walls and to continue to bring the room together.

Condo progress 1 005-001

Condo progress 1 007-001

-Emily

Installing a subway tile kitchen backsplash – Part 1

I’ve been talking about installing a tile backsplash in our kitchen since our daughter was a few months old. It was an incredibly hot summer, too hot to have a newborn outdoors for long, and so I spent a lot of time watching HGTV while I nursed. I incidentally also got into Pinterest around the same time, so I had a treasure trove of kitchen photos to sort through.

I decided early on that I wanted classic white subway tiles. Josh liked the idea of a subway tile backsplash too. The decision made, the only thing standing between me and a beautiful new backsplash was…me. I had never installed tile before and learning a new skill while simultaneously making a huge mess in our main living area didn’t sound very appealing. I put off the project again and again.

Fast forward to the present. Alice is 19 months old, and my parents volunteered to come for the weekend to help install the backsplash and to help us keep our busy toddler out of harm’s way. My Dad is a very handy guy and brought most of the necessary tools. I bought the tile, thin-set mortar, pewter gray grout, and matching caulk.

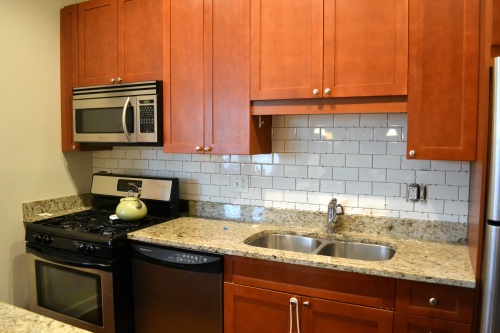
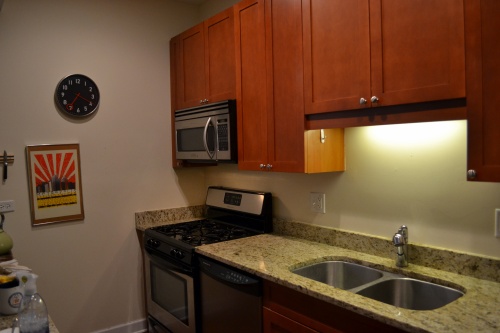
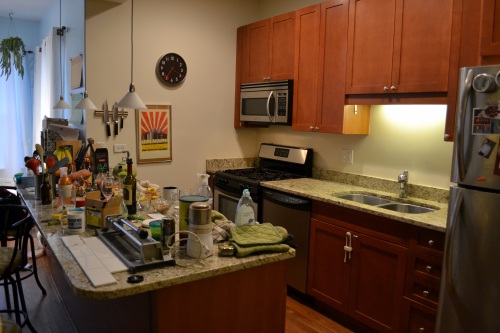
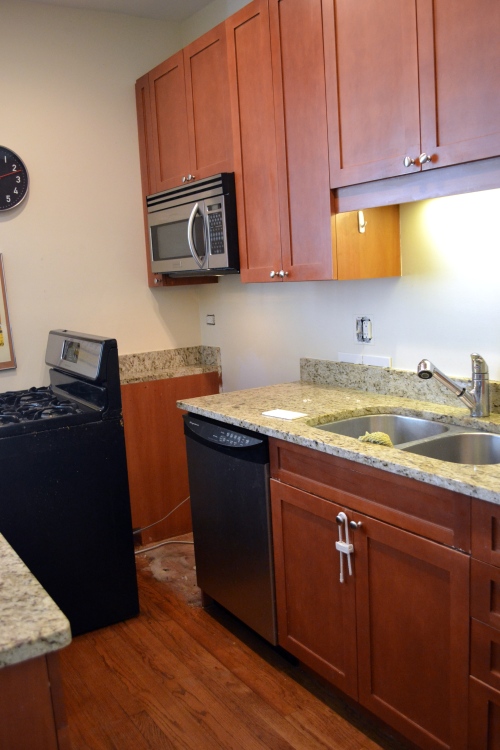
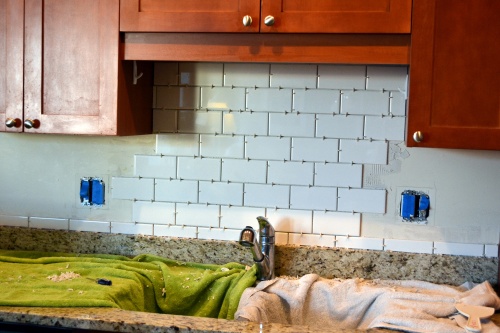
Here are a few before shots. We planned to tile all of the space below the cabinets.

Backsplash area before

Backsplash and wall before

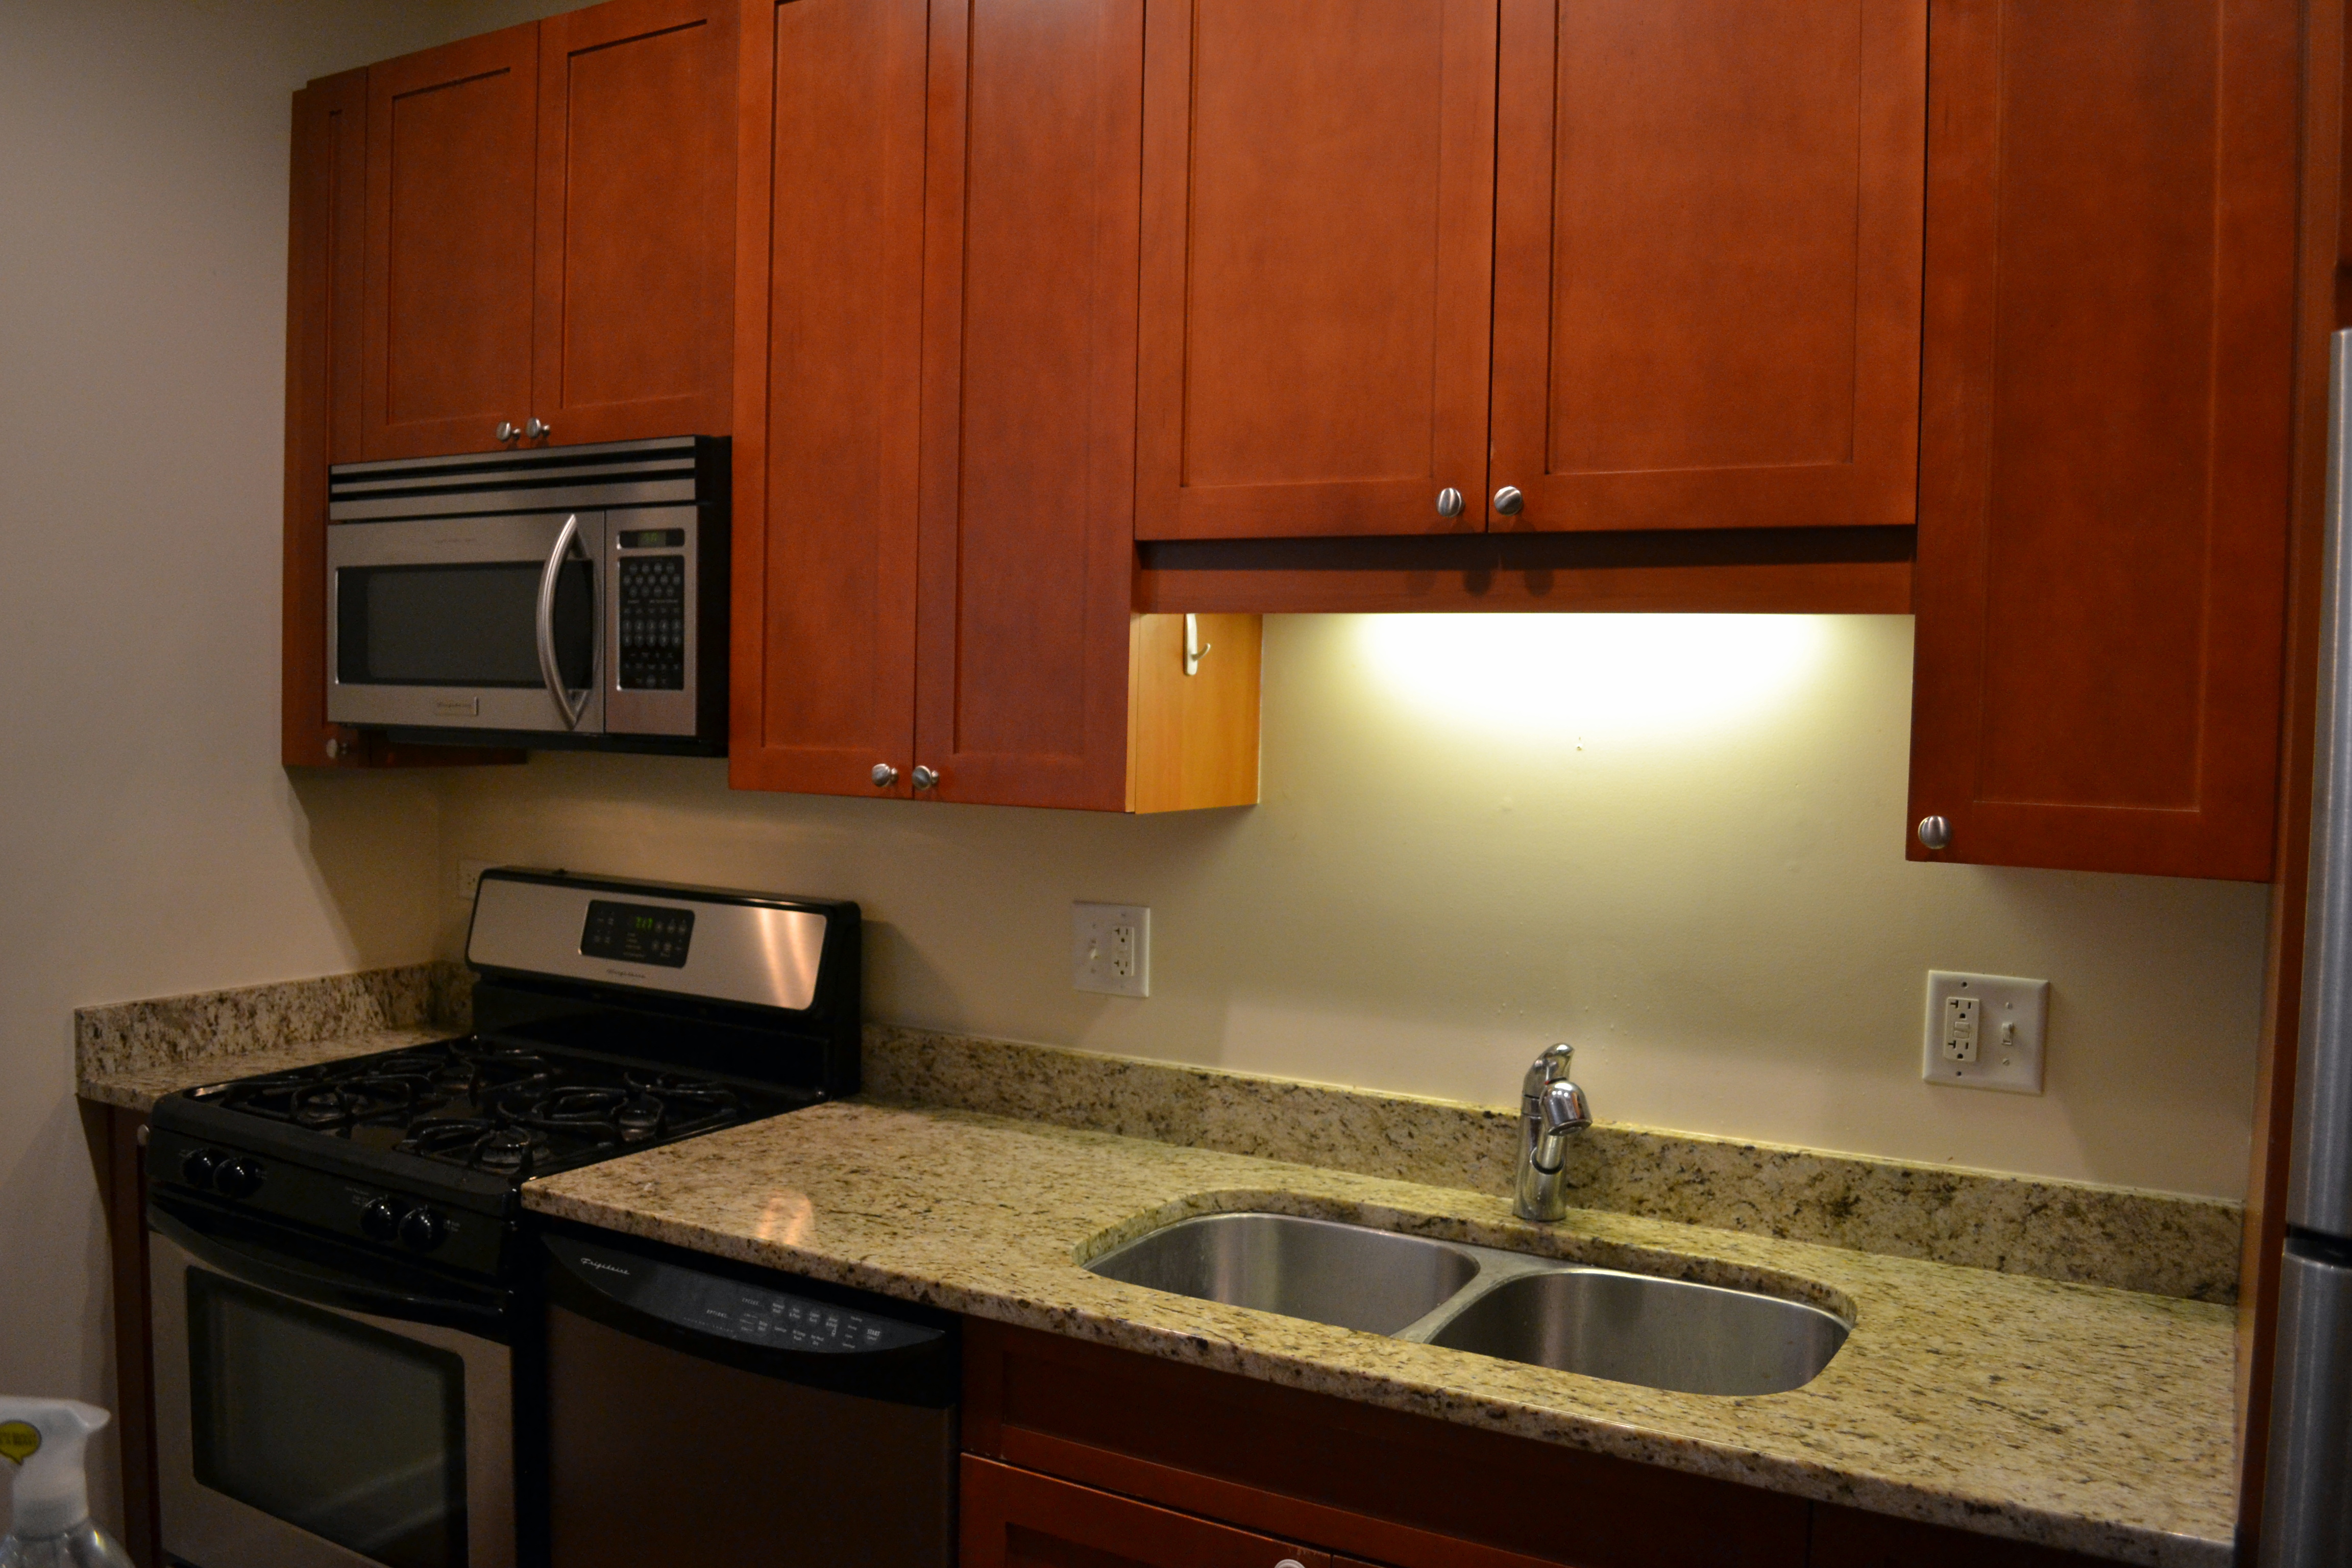
And here’s another before shot that shows the messy chaos. Framing the shot is everything, isn’t it?

Backsplash and island chaotic

The granite lip behind the sink and the counter area to the right of the stove did not extend behind the stove, so we had to pull out the stove and add a wooden board for support. (We hadn’t pulled the stove out in the four years we’ve lived in this condo. We discovered a lost toy and a lot of dust and dog hair).

Backsplash oven pulled out

DSC_0246-001

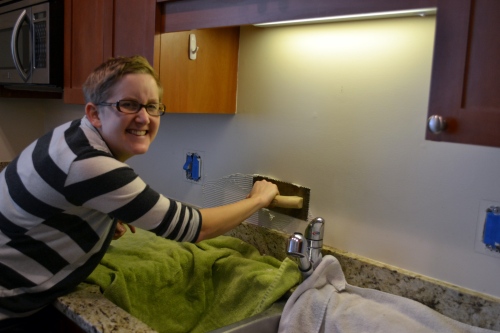
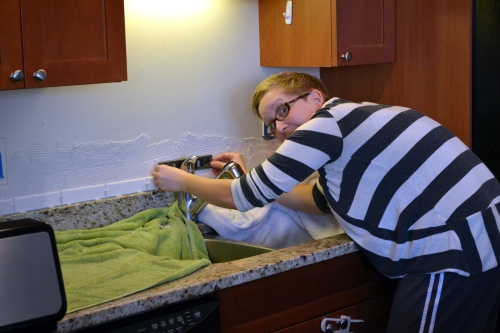
As you can see from the before photo, there are three outlet/light switches to work around. Unfortunately they were all at slightly different levels. We wanted to avoid making awkward or difficult tile cuts in the second row, so we played around a little with our first row. Dad decided that the tiles in the bottom row should be half width, so he used the tile scorer/cutter to create a row of half width tiles. I started to apply the thinset mortar. We initially tried applying it with the notched trowel, but eventually learned it was easier to use a spatula to smear the mortar onto the wall, and then go over it with the notched trowel.

DSC_0248-001

It is very important for the first row of tile to be level, so we went slowly, checking each tile.

Tile level

We had both 1/4” and 1/8” spacers, and decided that 1/8” would look best.

DSC_0266-001

One lesson learned along the way was that mortar dries quickly and with our attention to detail we were moving slowly. More than once we ended up scraping off an area of partially dried mortar in an area we hadn’t quite finished.

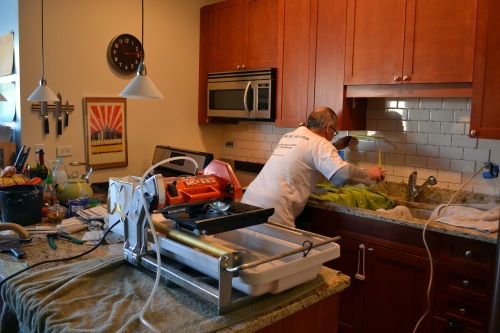
The one tool we didn’t own was a wet tile saw. We decided to do everything we could without the wet saw before going to rent it. We were able to do a lot with the tile scorer, but in any place where more than one cut would need to be made on a tile, we needed the wet saw.

Once we couldn’t proceed any further, I went and picked up the smallest wet saw Home Depot rented for the shortest period of time. I helped set it up, and Dad quickly got the hang of using it. Since we were only renting it for four hours, (and Josh and I had a dinner reservation), I declined to learn to use it myself.

Wet tile saw and kitchen

Dad and wet tile saw

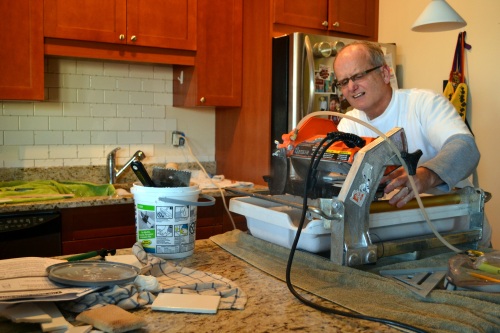
Due to the outlets, the cabinets, and the under-cabinet light, there were quite a few difficult cuts. With a little patience Dad made them all. At the end of the day, we had a beautiful wall full of tile and spacers. The mortar needed to dry for at least 12 hours before we applied the grout.

-Eliina

Wall with spacers

The Start of Something

I recently moved into a condo I have owned and rented out for about 5 years. I decided it was time to no longer be a landlord, though things had gone well for the time I have tenants. I am really excited to get things all settled and decorated. It will be a slow process but I have time. I think if I take time and work at it slowly it will come together nicely and I won’t make a bunch of rushed decisions. Here are a few photos of the space when it was completely cleared out, before I did any painting or moving in.

The living room is the first room I will tackle in decorating. I will spend most of my waking time in this room and so I want it to feel homey and comfortable. It is a nice size and I look forward to getting things settled in this room.

Condo living room before

Condo Before 2013 015

The dining and kitchen are right off of the living space. The kitchen is small but sufficient for my needs. There is enough room in the dining area that I could easily put the leaf in my table to expand for more people.

Condo kitchen before

Condo dining room before

A nice, but small, half bath finishes the rooms on the first floor.

Upstairs there are two bedrooms, both good sized. The one will be my room and the other vacant for now. I am not sure what I will do with my room yet. I have thoughts of making a headboard, changing the wall color and getting new bedding but I don’t have anything specific in mind so for now I am content with using what I already had.

Condo Before bedroom

Condo other bedroom before

Completing the upstairs is a full bathroom. The bathroom is not large but with only one person having to get ready in the morning it isn’t a big deal. My dog Nelly doesn’t require any indoor bathroom time to get ready in the morning.

Condo bathroom before

So that is a little tour of my home! I have already started with some changes and I’m liking how things are coming together.

-Emily

Christmas Comfort

A request was made of me probably six weeks before Christmas. Would I be willing and able to make an afghan for Christmas, something in shades of reds that would be out only for the holidays and which  would possibly in the future be a favorite blanket of my niece and any future niece or nephew? How could I resist?!?

I knew this would be quite the undertaking but I was willing to go for it. The request was for a plaid afghan so I made my way to Hobby Lobby to choose the yarns I wanted to use. I have made this certain pattern only once before and I did it with three colors.  For this project I decided to use four colors, red, white, dark red and a variegated red and white yarn.

The project is very simple, but time consuming. The horizontal stripes are made with alternating double crochets and chains. There is a repeating pattern, each of the colors was assigned a number. For example any time I was using the red yarn I would complete five rows, the white yarn would only be one row.

afghan 006

I completed the pattern six times to ensure that the finished product would be long enough after completing the vertical strips.

afghan 004

The vertical stripes simply involved using a larger sized hook and slip stitching from the bottom of the afghan all the way to the top one row at a time. I used the same pattern for the vertical rows as I did for the horizontal. This portion of the project is time consuming because you have to be extra careful to keep tension the same so the finished piece turns out with nice straight edges.

DSC_0212-001

DSC_0209-001

The final step is pulling in all of the ends…let me just say there are a lot of ends, with changing yarn colors as frequently as I did for this project there were probably over 200 little tails that needed to be pulled in.

Because this was a Christmas present I had to have this done before a certain sister arrived in town for the holiday. This didn’t happen so I did have to spend a little bit of time up in my room, by myself to keep the secret for a few more days. When I was wrapping the gift up on Christmas Eve with Alice in the room with me I knew the project was a success. The blanket was laid out on the floor, just so I could make sure I liked the finished look of it and the little darling laid right down on it.  When I tried to pick it up and give her a different blanket and was not a happy camper. Maybe she was tired, but I think she knew that this was going to be a special afghan for her for many years to come.

-Emily

Thanks, Em!  It looks awesome on our couch! -Eliina

DSC_0205-001

Plaid scarf pillow

Emily’s Chicago visit was months ago and I’m just now writing up our final project from that weekend.  We were super busy! In addition to my regular sofa pillows in shades of yellow, cream, and grey, I wanted to make some pillows that would work with our Christmas decor.  I searched local fabric stores for an awesome red plaid…and found nothing.  Very disappointing.  Then when I was shopping at H&M one day after work, I came across a fantastic, classic, very wide red scarf.  Perfect!

First step: confirm that the scarf is in fact cozy.  Emily performed the assessment.

DSC_0912

After measuring the pillow we were covering, Emily trimmed the fringe off the scarf, and then cut the front panel.

DSC_0910

Exposed brass zippers are having a moment in fashion, so we thought it would be fun to add one to the back of this pillow instead of using a pocket closure. (As with the monogram chevron pillow, I wanted this pillow cover to be removable and washable).  Emily cut two panels for the back side of the pillow.  My super helpful contribution was to pin the three pieces of fabric together!

DSC_0915

Then, Emily did the real work.  So, I’ll let her tell you what she did.

I have never sewn a zipper into anything but I knew with a little thinking and maybe trial and error I would be able to figure it out. Now that the zipper is installed I would do it a little differently, but I will get to that in a bit.

The pillow had been all sewn together with an opening down the middle of one side for the zipper. When the fabric for the two back pieces was cut we added an additional ½ inch to the width so there was room to fold over the fabric and sew it to the zipper. The plan was to allow the zipper to show on the back of the pillow for added detail. I laid the zipper in the middle of the opening, with the fabric turned right side out, and made sure the fabric was laying nice and flat, this would help to make sure that I wasn’t pulling the fabric which would potentially make the pillow cover to small, or make it pucker. After this was nice and flat I took the fabric on the left side and folded it under to create a nice line, I then pinned this to the zipper in a few spots, making sure that the placement was fairly even down the zipper so the finished product looked nice.

DSC_0935

After things were pinned where I wanted them I sewed the left side of the zipper to the fabric. This was nice and easy because the pillow was still open down the center.

DSC_0946

Then as I began to repeat this same process on the right side of the zipper I realized I had made a mistake! Because I had sewn the rest of the pillow together there didn’t seem to be a way to sew the other side of the zipper to the fabric, I had left no opening in the pillow so any further stitching would end up sewing the back and the front of the pillow together…not the effect I was going for and to top it all off I had not brought a seam ripper with me so undoing a seam was going to be quite the process. As I sat and festered about this I realized that I could unzip the zipper! What a novel idea! Once I did that I continued with the same process as before of folding, pinning and sewing.

The zipper we chose was not the same length as the pillow so there were about 2 inches on the top and bottom of the zipper that still needed to be sewn together. I turned the pillow cover inside out and sewed a quick seam down to meet the zipper. Zipper installation complete!

Now for what I would do differently: I would install the zipper BEFORE sewing the rest of the pillow together. This would make the process a little easier.  -Emily

Here’s one last shot of my crafty sister Emily on my couch with all three pillows that she made for me! Thanks, Em.  -Eliina

DSC_0950


Quilting Adventures Part 2

This weekend I finally got back to working on the quilt I started a while ago. I had made part of the top previously and the tasks I had left were:

  • Add a border to the top and section dividers
  • Cut the back to size
  • Buy the batting for the middle
  • Pin and sew the top, back and batting together
  • Tie the quilt

This list is why my project has not been finished. I have never completed these steps in quilt making by myself. I have been a part of making tops a number of times and I have tied quilts.  I’ve never completed the important middle steps before so I just wasn’t sure how things were going to develop, so I put this project on the very back burner for a while. Enter this weekend. I was ready to be productive and get a few things completed, or at least closer to completion. Between doing some holiday baking and working on a couple of secret gift projects I worked on and finished Nelly’s quilt!

Quilt Part 2 002

My first step was deciding how wide I wanted my border to be.  This would be the same width as the “section dividers”. I decided that about three inches would be a good width so I got to measuring and cutting. To leave room for the seam I cut seven 4” wide strips. The next step was just pinning them one at a time to the strips that I had made previously and sewing them together.

When this step was done I had a nice rectangular top ready to be pressed. I had been advised to NOT iron my seams open as I had seen in some other tutorials but rather to press them all in one direction. The reason for this was it would keep the seams stronger in the long run, when they are pressed open the stitches can be stressed more which would lead to stretching and potentially breaking.

I measured my top when it was all pressed and flat, and it was roughly 51”x58”. This was great except for the fact that the fabric for my back piece was only 45” wide and about 106” long so I was going to have to do some additional cutting and sewing. A couple of quick cuts later I was zipping the back through the machine, nice and easy. I pressed this as well and then asked my momma for some advice.

As previously stated my quilt making experience is limited. I wasn’t sure how to finish the quilt. What would I sew together to get the top, bottom and batting together? I took the three possibilities and went with what I thought would look the best without taking too much extra time This involved pinning the bottom, top and batting all together and then sewing around the edge, leaving a 10-12” gap so I could turn the quilt right side out when I was done. This involved layering the three pieces and making sure they lined up nicely, easier said than done when working on the floor, but I got it accomplished.

Quilt Part 2 009

Quilt Part 2 017

Quilt Part 2 013Quilt Part 2 007

Sewing it all together went smoother than I thought, I had a problem with the thread tension to start but after that I was off and running—ummm sewing. I left about a 10 inch opening at the bottom of the quilt and just reached in and grabbed a corner and carefully started to turn the quilt right side out.

Quilt Part 2 019

At this point I was very excited with how my quilt looked, for just piecing together scraps it was looking good! Two final steps and the I would be done. First I folded the fabric at the opening and took my needle and thread to it, just slowing stitching it closed. Then I laid the quilt out on the floor to tie it, this step it necessary to keep the 3 layers together when in use. You can also quilt the top in various ways but I knew that was not what was needed.  This quilt is going to be used by my dog Nelly, so she can lay on the couch and keep at least some hair contained!

Quilt Part 2 034

Quilt Part 2 030

Though this took a while to complete it wasn’t because of difficulty really, it was just procrastination. But I am really happy with the results and would definitely consider taking on another quilt someday. But for now I will just let Nelly enjoy her gift. Isn’t she a cutie all snuggled up!

-Emily

Quilt Part 2 037

Sorry for posting this so late!  Emily wrote it before Christmas but her slacker editor didn’t get it up until now. -Eliina

Let the Decorating Begin

I love Christmas. I love the music, the decorations, the time with family, everything. Over the years I have started to do quite a bit of the decorating at our house and got a start on it this past weekend. We have a lot of options for decorations and not enough space for everything so the house looks different every year which I think is fun. This year I decided that the buffet would be one area that was done up completely different than it had been before.

Gold 007

Gold 012

This fall I made some faux enamel vases and I decided it would be nice to include those in my buffet arrangement. I have also always loved the look of ornaments piled up in a glass cylinder and we conveniently had a selection to choose from out in the garage!

Gold 001

Now that I had some height to work with I started to search through the boxes to find some gold ornaments to use. I quickly found the box of gold and got to work filling the container with godliness. There isn’t really any rhyme or reason to the way that I placed the ornaments, I just put in a few and then moved them around until I liked how they looked.

Gold 021

Next I found some red berries that I thought would bring a little brightness to the arrangement of gold, we have used these before on our trees, but this year they were getting a new use.

Gold 018

I used a couple of boxes to lift up the smallest vase so it didn’t get hidden in the gold fabric I chose to use to add some texture and shine to the buffet.

With three vases on the left and one large container of ornaments on the right I knew I needed something with a little more height in the middle to balance things out. I went back out to the garage to see what we had in the artificial tree department and I was in luck! We had a perfectly sized tree, about 2 feet tall and narrow enough to fit nicely in the space I had left.

The only item that I purchased new for this display was the gold pinecone candle. I saw it at Target when I was wandering through last week and I knew I had to have it, and an added bonus is the candle actually smells good!

Gold 019

I am really happy how the buffet turned out. Something different but almost everything was already in our Christmas stash. I continued my decorating binge and have things just about finished.  The only thing we need is our REAL tree.  Maybe this weekend we can trek out to the tree farm and pick out the perfect, narrow, but tall (if we want it to be) tree!

-Emily

A Step Up

For about 13 years, as long as we have lived in this house, we have been piling our afghans on the speaker behind the TV cabinet door. Sometimes they’re in a neat pile, more likely though the pile ends up falling over the side and spilling onto the floor a bit. We use the blankets regularly so putting them out of reach in a closet, or even in some sort of storage container out of the way wasn’t really going to work for our situation.

Enter Pinterest! My mom was recently searching around and found the inspiration, or pinspiration, for this project: a whitewashed ladder that leans against the wall. As an added bonus we had all of the supplies that we needed for this project, so it was FREE! We needed a wooden ladder, white paint, paint brush and rags. There were three ladders to choose from in our collection. (Eliina’s note – I wish I had the storage space to be a pack rat, I mean collector, like you). Mom selected the one she wanted to use and set it up on a couple of saw horses to get it off the ground. She used a scrub brush to clean off the dirt that had accumulated on the ladder while it was out the in yard.

Meanwhile I researched how to make whitewash.  There were quite a few different recipes out there on the web but we went with the simplest:  a ratio of 2 parts paint, 1 part water.   We used part of a milk jug as a vessel to mix the paint and water. I rinsed out an aluminum vegetable can and used that to measure the water and the paint.  A half a can of water and one can of paint was more than enough for this project.

Before we started painting there was a small repair to do on the bottom rung of the ladder.  One side of the rung  was a bit loose after being outside in the elements. It was a really quick fix.  After putting in a new screw it was sturdy enough to do the job.

Now for the real work. The process we used can be done by one person, but my mom and I tagged teamed it. She worked down one section at a time, painting in long sections and I followed behind with a rag to wipe off some of the paint to give the ladder the whitewashed look we were going for. There isn’t a hard and fast rule to how long to let the paint set.  I found that after a few minutes it had soaked in a bit and I could go along and not wipe too much off. The other factor to keep in mind when doing any whitewashing is how aggressively you wipe off the paint. Lighter pressure will leave more paint on the wood and heavier pressure will remove more. We simply moved in sections, going back if too much paint was rubbed off or if there wasn’t enough coverage to begin with.

We decided that one coat was perfect. It left enough of the wood grain showing through but it still looked intentionally whitewashed, and not just worn.

We left the ladder out in the yard to dry for the afternoon and overnight, after checking the weather forecast for rain!

We had recently rearranged the living room furniture for fun, and there was a spot in the corner of the room that was screaming for a little something with texture and height.

After putting the ladder in its location mom took the six blankets we had previously stacked on the speaker (yes we like options when it comes to warmth) and placed one on each rung of the ladder. Doesn’t it look great there in the corner, and doesn’t the speaker look better without a pile of afghans on it!

-Emily

Smitten Kitchen visits Chicago

On one of the great things about living in a city like Chicago is that no matter what you’re into, there is usually something going on that will interest you.  I’m a big blog reader, and incidentally several of my favorite bloggers have been on tour promoting their books recently.  Emily and I went to the Young House Love book signing the other week, and this past weekend I attended the book signing for the Smitten Kitchen Cookbook.

I have been a fan of Deb Perelman’s blog since 2008, and have tried dozens of her recipes over the years.  The Chicago book signing was held at one of my favorite independent bookstores, the Book Cellar in Lincoln Square. (There is a bar in the store, what’s not to love?) I anticipated that an author of her popularity would draw a big crowd, so I arrived an hour before the event start time.  The Book Cellar is a small space, and a winding line outdoors would block the entrances to other nearby businesses.  They had an interesting strategy for dealing with the crowd that was gathering to have their cookbook signed – they assigned attendees a group, much like boarding groups on an airplane.  Each group had eight people, and since I was in group K, there were at least eighty people ahead of me.

My friend Lindsay lives in Lincoln Square, and came by to hang out with me.  Lincoln Square is an old German neighborhood in Chicago, and while the neighborhood has changed over the years, some classic German bars and restaurants remain.  We found a pair of seats at the bar at Hüettenbar and settled in for a few beers.

After leaving the bar we killed time in a kitchen shop before heading back to the store to find out if my group had been called.  I spotted the author’s husband and adorable toddler son leaving the store as I was walking in to meet her.  She was sweet and gracious in person, and as you can see posed for a photo with me.

I leafed through the book in bed later that night, and have tabbed two recipes to make for Thanksgiving dinner this week, and many more to make later.  I highly recommend her blog, and the book looks like it will be a great resource too.

-Eliina